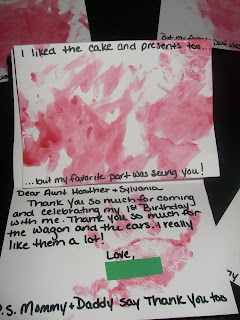
 As promised I'm sharing a tutorial on how to include your little one in the Thank You note process. I'm hoping that if I start with Bubba at a young age that it will be easier to keep him doing this as he gets older. What you'll need:
Nontoxic paint
Paint Brush (I used foam)
Dish
Cards (You can find blank white cards at your local craft store)

I started by putting a small dot of paint in my dish and then adding some water, figuring it would make it easier to clean Bubba up. Luckily the paint I used is water based and non-toxic, though Bubba didn't try to eat it (thankfully).
I handed Bubba the foam 'brush' and a card. He was amazed at the brush and even after being shown what to do didn't quite get it...
 So, it turned into finger painting. He was so proud of himself seeing what was happening to the color as he moved his fingers around.
 And each one turned out unique.
 I used one of my drying racks to allow the cards to dry. That way they'd be out of the way of his little artistic fingers.
 On the outside of the cards for his family that came to the party I wrote "I liked the cake and presents too, But my favorite thing was seeing you." On the inside is your basic Thank You note with a hand print from Bubba. I wasn't sure how to sign it, and after much thought decided to sign it from James with a PS stating that Mommy and Daddy say thank you too.
 On the Thank Yous for people who just sent a gift they said "I'd like to thank you twice... Once for _____ and once for being nice." Signed again in the same manner. I figured that since it was mainly family giving the gifts to Bubba that they would all appreciate a little piece of artwork from him.
No comments:
Post a Comment